Wednesday, February 27, 2013

I Got New Kicks!!

Until this week, I've been rocking the same pair of workout sneakers for the last 2 years... I got them while I was living on Cape Cod during an impromptu TJ Maxx shopping spree with my friend April around Easter of 2011. At the time, I loved them - a brand new pair of workout sneaks will do wonders for your exercise motivation, and I felt awesome as hell in my new pink and greys.

That pair of workout sneakers feels way less awesome and snazzy two years later. It's not exactly my fault that I waited this long to replace them. Oh, whose fault is it, you ask?

NEON'S.

That's whose.

I know you noticed the absolutely obnoxious assortment of workout sneaker colors that have been all the rage in the last 12-16 months. You couldn't walk past a Foot Locker without putting your sunglasses on - the most ridiculous 90's neon color combinations were just assaulting your eyeballs from the storefronts. I blame it on the 2012 Olympians... they were all sporting the worst neon yellow highlighter sneakers that this side of the year 1994 has ever seen.

Apparently I was the only one who got the memo that your workout sneakers don't need to be so visually abrasive. I could not bring myself to buy any of those shoes, no matter how badly I needed a new pair. I'm someone who listens to my gut when shopping - if I get a really great "feeling" when I see an item, I know that it's my style and that I should try it on or buy it. It's like having a very quick conversation with every item I see in a store.

And every conversation I had with those ridiculous neon sneakers ended with me saying, "NOPE."

Thank goddddd that the tides are turning and the colors are returning to normal! I was finally able to find some sneakers that don't look like they belong on a space mission!
Nike IN-Season TR2, black and white
.  no shades required for viewing  .
They're Nike IN-Season TR2's and they are not wack. They even have a fancy gel cushion on the inside. My last Nikes were not cross-trainers - they were actually running shoes. Now that I know better, I definitely wanted to make sure my next workout sneaks were cross-trainers. The biggest difference that I can point out between the two is the thickness of the sole, and thus the distance that your feet/heels are from the ground. Closer to the ground, your foot and ankle are more stable and less likely to roll. So if you're doing something like squats (where it's important that your footing is stable and your ankle doesn't roll), you'll want a training shoe. If you're doing mostly running, it's more important to have the right support to cushion that high-impact activity and you would want a thicker, more cushiony sole. #Learnin.

I've worn these to the gym once already and they felt great. They fit really well (I wear a size 8), they're pretty lightweight, and - most importantly - they are not neon orange with highlighter-yellow stripes and neon teal swooshes.

And! There was a sale going on - buy one pair get another half off - so I jumped on it as an opportunity to scoop up something else I'd been wanting: a pair of all-white, low-top Chucks!

all white low top chuck taylors
.  fresh  .
I like to have a couple pairs of the high-tops at all times, but this is my first pair of the low-top Chucks. These were running huge and I had to buy them in a size 7.5, which I haven't worn since middle school. I was also looking for some all-white Adidas shell toes, but those were nowhere to be found so they'll have to wait for another day I suppose. I went through a few pairs of those in college and they're classicccccs. In the meantime, these new low-tops are going to get plenty of use this spring and summer!

This was definitely a spur-of-the-moment shoe shopping trip. I was just so surprised to not be appalled at the sneakers in the front of the Foot Locker that I had to take advantage of it and just pull the trigger on some new kicks. The best part is that each pair of sneakers cost way less than I'd expected to have to pay for them when they went onto my List Of Shit To Get. Holllllla!

And now, some Jay-Z and some Justin Timberlake to celebrate them going on tour together:


What do you use for workout sneakers? I'd be very curious to know!
Monday, February 25, 2013

Random Nail Inspiration: Demoiselle Jewelry Designs

I have a running list of ideas for blogs posts and nail polish designs, and some of them are more random than others. This is one of the rando's.

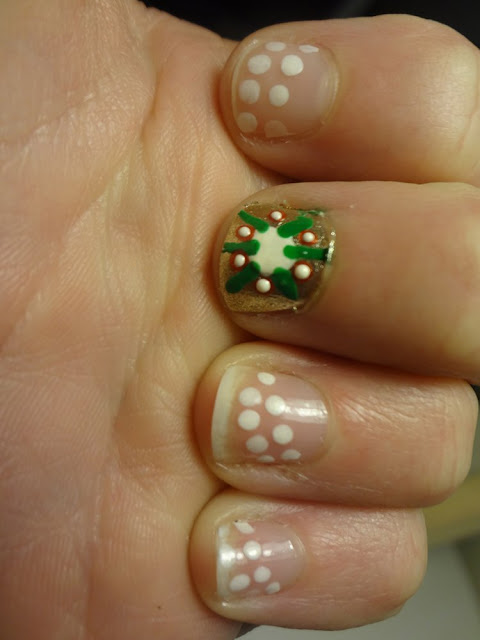
I was recently inspired to create a nail polish look based around a Demoiselle Jewelry Designs piece, and once I began it, it only took a few minutes to complete. It's very simple, but I like it because it's different!


Demoiselle is a small jewelry design business run by Lauren Hastings - the girlfriend of a friend of mine... which by direct association and the strong level of love between all of my friends means that she is my friend now, too, whether she likes it or not. ;)  Lauren's Quincy, MA-based home business has been increasing in popularity over the last year or so and she's now basically famous for her colorful pearly creations. You should definitely check out her jewelry right n'yah: Demoiselle Jewelry Designs. She even has a fancy Flash site. Sew sassy.

As of late, Lauren has been posting a lot of pictures on her Facebook page of antique brooches being used as centerpieces for pearl necklaces, which brings us to the nail polish design that I made. I wanted to create a pearl necklace with a brooch centerpiece, JUST LIKE LAUREN'S:
.  you'll notice that lauren's is a bit more.... talented than mine  .
Here's what I did:

Step 1: Paint all your nails with a dual action base/top coat polish to make ya shit really shiny.

Step 2: Using a dotting tool dipped into an off-white, pearly polish, add one strand of "pearls" across all of your nails except your middle fingernail:


Ignore the two rogue dots on my middle finger in the above photo. They belong to an original version of this nail polish design that I tried, which I ended up re-doing entirely for this particular version. 

Step 3: Add a second strand of pearls, if you're feeling feisty. I clearly was.

Step 4:  Paint your middle finger two coats of a gold polish. It's the start of ya brooch, bitches!!


Step 5: Add a pearl to the center of your middle fingernail as the center of your brooch:


Step 6: Add your green flower petals. I used a toothpick dipped into green polish to do this:


Step 7: Add these little orange dot things between your petals. Again, I used a toothpick to do this.


Step 8: Finally, add some tiny white dots to the top of your orange dots. I don't know what these little guys are, but they are amongst the decorative touches in the brooch in Lauren's necklace, SO. 


And you're done!


Now that I've done one type of "pearl necklace" nail, I'm going to do mo' fo' sho'. I think it's a fun idea and is super versatile, considering the number of things you can use as your accent nail. 

What do you think? Will you try "pearl necklace and brooch fancy jewelry" nails? I'd love to see it if you do! Tweet me a pic @akaBailey!

Friday, February 22, 2013

I Was Almost Eaten By A Human-Sized Spider

Practically.

The other night I was getting ready for bed at around 10:30ish and picked up a pile of clothes off of the floor when ALL OF A SUDDEN a behemoth of a spider came galloping out from beneath the pile and sprinted across the rug and under our bed. I literally screamed. Like, not shrieked or eeked. I fucking screamed. Of note is that Dave, a seasoned veteran attuned to my tendency to sometimes.... overreact, didn't even come into the room or inquire from the other room what the trouble was.

I am - 9 times out of 10 - the one who "takes care of" spiders or creepy bug issues in our home. But that night, I wasn't even considering being the one to rid our home of the biggest spider I've ever seen. No-effing-way. Nope.

This thing was the freaking My Buddy of spiders - pretty much life-size and wearing overalls. (Unrelated sidebar: You should know that as a child, I had the My Buddy and Mallory had the Kid Sister. Telling? #BigSistersGetWhatTheyWant #AlsoIWasATomboy #WhatupMatchboxCars?!) There was not a chance that we were getting close enough to it to swat it with a shoe or some other hard surface, because we'd be risking losing our hands to this predator's most-likely-ferocious piranha teeth.

So we had two choices:  Either surrender our entire apartment to the pseudo-tarantula or find a way to 86 it without getting near it.

We went for the latter. Once we had it cornered under our bed, Dave fetched the vacuum cleaner and set out chasing the Cloverfield spider around beneath our bed with the hose attachment of the vacuum till he managed to suck it up.


Size-wise, this pic makes it look a little bigger than it really is. But each of those legs is over half an inch long and its body looked like the size of a yellow jacket. SO. It probably could have eaten and digested me in a matter of minutes.

Probably.

Does this picture give you the weirds like it gives me the weirds? What was a spider that size doing inside my home? And - more importantly - does it have any buddies hanging out in any other nooks and crannies that I should know about? Creatures this size don't just get a free ride in this apartment. I WILL start charging rent. 

Monday, February 18, 2013

DIY: Re-Purposing Holiday Lights

I mentioned in my Thrift Shop Challenge blog that I was accumulating glass jars to use for a decor project in our apartment. It's finally time for me to post about the project!!

Here's the finished look, and then I'll go into the steps I took to put it together:

DIY: Re-Purposing Holiday Lights

During the months of December and January, a yoga store on 4th Ave was displaying something similar to this along their entire storefront window, using dozens and dozens of mason jars of different sizes. I thought the idea was so pretty and since it only required two "ingredients" - glass jars and holiday lights - I could not pass up trying to recreate the design at home. We even had a perfect surface for the project, on top of a wooden dresser in our bedroom.

And so, several weeks back, I began holding onto our empty glass peanut butter and pasta sauce jars, as well as any other miscellaneous glass jars we emptied.


To make sure they were extra spotless, I took care to soak them and clean them well to remove all of the sticky residue left behind by their labels:


You can remove any additional stubborn sticky stuff from the jars by rubbing it off with a cotton ball soaked in rubbing alcohol.


My neighbor even donated a few actual mason jars to the project! Once she gave me those, I finally felt like I had enough jars to set them all up with the holiday lights on the dresser top.

I took some time to arrange and re-arrange all of the jars until I found a configuration that I liked. That was probably the most difficult part of this entire project! After that I just began carefully stuffing each jar with the strand of lights, one jar at a time. Be careful not to break any of your tiny little light bulbs on the glass jars while you're doing this. You'll really get pissed if that happens.

I ended up leaving a couple of the smaller jars empty, which seemed to work out fine and still looks nice. I love the finished look!


This provides so much more light to our bedroom - it's wonderful! And, if you ask me, it's a pretty classy way to be an adult and use holiday lights in your decorating. When was the last time outside of a dorm room that you thought holiday lights were a good year-round decor decision?

Let me know if you like this or if you try it out as well :)

Update 12/2/13: Hey guys! These jarred holiday lights have been a staple in my home decor for almost a year now. That has given me time to notice that after a couple of hours the lights do become a bit warm inside of their jars. Just wanted everyone to have that on their radars so that you would know not to leave them turned on for too long. When they're warm enough you might notice a strange plasticky smell in the air, from the cords warming. Just sayin'! #BeSmart. #SafetyFirst. #MyDadIsAFirefighter #CanYouTell?

Find me on Facebook!
~ Holla @ me on Twitter ~

Follow on Bloglovin

Sunday, February 17, 2013

Update on Our Lemon Cypress Tree ♡

I recently picked up a 4-foot tall lemon cypress tree from our neighborhood Kitsilano Food Mart, which I mentioned in my blog about a Sunday full of picking up gooooooodies from around my Kitsilano neighborhood.

I carried the tree home - less than a block, no biggie - and set it down in our living room, in the spot that our Christmas tree had been standing for the whole holiday season.


We'd really been missing the light of the Christmas tree and in the tree's absence we also realized how empty our living room suddenly seemed!

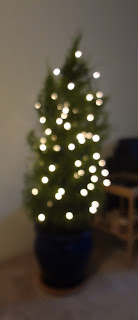
The next step would be to properly pot the plant and then (!!!!) string it up with Christmas lights, for a year-round-appropriate, double whammy of a lighting fixture{slash}beautiful plant .

A week or so later I got around to fetching a brand new pot for the tree, because it deserved something really pretty to go with its bright citrusy green color. Dave and I had recently discovered that The Kitchen Corner - an awesome "every needs imaginable" store on 4th Ave - had an entire basement room FILLED top-to-bottom with plant pots of every size and color. I'm telling you - if you are in the Vancouver area and want a nice selection of pots for your plants, please just skip every other option and go straight to The Kitchen Corner on 4th in Kits. It's like Disney World for potted plant enthusiasts.  So when I needed to find a pot for the new lemon cypress I was excited to spend some time thoroughly perusing the selection in The Kitchen Corner's basement.

I love the look of a really bright blue against a really bright green - it's part of the reason I'm so fond of taking outdoor pictures on sunny days - so I snagged this beautiful blue pot when I saw it on the shelves because I thought it would really complement the bright green plant:


I believe it cost $24.99-ish? It's about a foot tall.

I love it! David potted it for us and even strung the lights up himself, too!! I was pleased with his enthusiasm about the project :)


I've been working on some other projects around the home, too, to make it look less empty in here. My goal is for my 4-year-old nephew to stop asking me where all of my furniture is when I Skype with him. Stay tuned for a couple adventures in home decor!

Friday, February 15, 2013

Taking Advantage of a Sunny Vancouver Day

I don't mind the rain in Vancouver, truly. I loved winter and playing in the snow when I was a kid, but I got over it at some point in my teen years. Probably when I got my license and started having to shovel snow off of my own car and drive around in the freezing cold without heat (I only seemed to drive models of cars with inoperative heat mechanisms as a teen and young adult). So now that I'm in the Pacific Northwest, I'm kind of digging the snow-less winter season. And, possibly because I have a side of me that enjoys a bit of gloom and lack of sunshine, I've never minded the rain either. I like the sound it makes and the way it makes everything smell, and I feel like as long as I've got the proper rain jacket and waterproof boots, it's rather enjoyable to walk around in as well.

However, all that said... the frequent rainy days here sure make the sunny, clear days taste like golden chocolate sprinkle unicorn fantasy ice cream. I'm constantly in awe of how gorgeous the view is from my neighborhood and on sunny days it becomes just spectacular. A few weeks ago on a perfect and clear day, I took a walk with my camera over the Burrard Bridge and am TOTES excited to share the photos with you so you can get a taste of just how beautiful the surroundings are here in Vancouver. I feel very fortunate to be living here - in a place that I never expected I'd ever be living.


No complaints about these mountains. You should see how they look in the dark on a clear night - with some of them lit up with their ski mountain lights and others just illuminated in the darkness because of their white snow caps. Le sigh....... Sorry I think that "le sigh" came out because I'm listening to Madeline Peyroux as I write this. Anycrap, come visit beautiful Vancouver!

Thursday, February 14, 2013

Sally Hansen Coral Reef + Neon Hearts

Happy Valentine's Day! I bought a new nail polish recently - a Sally Hansen Hard As Nails Extreme Wear polish in the color Coral Reef. It was so bright and cheerful and eye-catching in its bottle that I thought it would be a great color for spring... or now... or whenever I wanted to wear it, really.

Incidentally, it's the same exact color as a sweatshirt I got recently while thrifting in Vancouver:

sally hansen coral reef nail polish

SO. Guess that color is trending... with me.

This past weekend I tried it out for the first time and ended up taking it two steps further to ultimately create 3 different nail polish options. #thisgirlisonfiahhhh (#ihatethatsonnnngggg) As it turns out you can even wear this today for Valentine's Day!

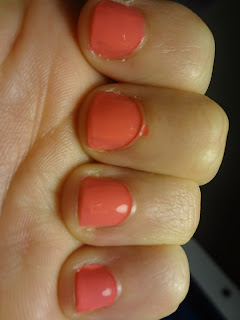
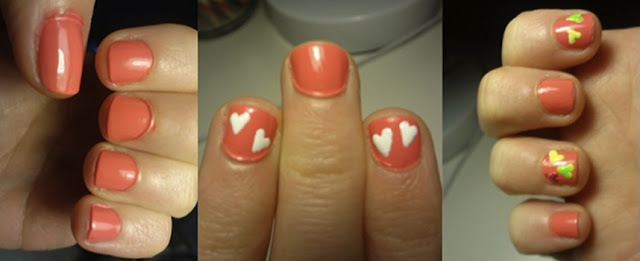
Starting off with the first option of just rocking Coral Reef, as is. This was a bit streaky after the first coat, but was pretty much good to go after the second coat was applied.

1 coat   vs   2 coats
sally hansen coral reef nail polishsally hansen coral reef nail polish

This polish looks insanely different in different lights. Indoors, it can look either ultra peachy, ultra corally or ultra hooker chic. Like, crazy neon orange looking. Outdoors it looks much pinker and looks more like a neon pink. Look at the color differences below:

sally hansen coral reef nail polish
.  inside  .
sally hansen coral reef nail polish
.  outside  .
That shit cray.

So for the second option, I added white hearts to just a couple of nails using a dotting tool:

valentine's day nails, white hearts on sally hansen coral reef

I was doing this solely for the ensuing 3rd step of adding more colors on top of the white hearts. Nail polish tip:  Just like with any painting project, you'll get a more vibrant color payoff if you begin with a white base. It will really make your top layer's color pop! So I was painting these white hearts as mere base hearts for my upcoming neon hearts, but I really liked the way the white hearts looked, too! I almost stopped there... but I really wanted to see how neon hearts would look, so I kept going...

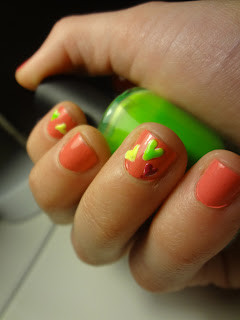
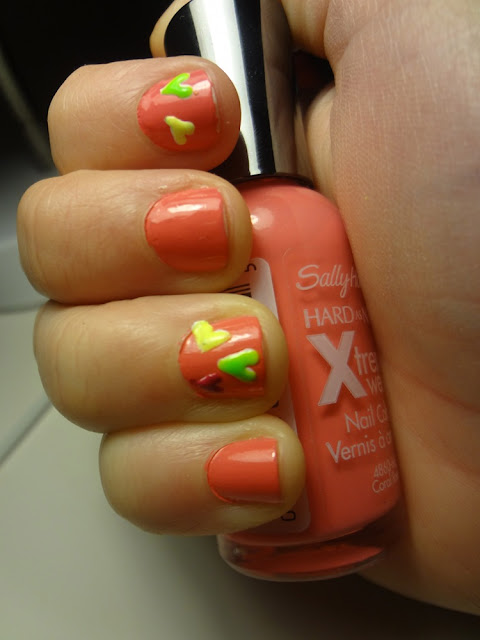
... to my third nail polish option: Adding neon hearts! After the white hearts had sufficiently dried I used a few different neon polishes to add hearts right on top of where I'd laid down the white hearts earlier. I happen to have a nice selection of bright neon-ish colors:

neon nail polish
Sally Hansen Insta-Dri in Flashy Fuschia
Neon Green by Love & Beauty
Sunshine by Claire's Cosmetics
(And that's Coral Reef on the far right)
painting nails
.  artsy progress pics  .
painting nails

neon hearts on sally hansen coral reefneon hearts on sally hansen coral reef

neon hearts on sally hansen coral reef

And there you go! Which one do you like best?

neon hearts on sally hansen coral reef

neon hearts on sally hansen coral reef

Happy Valentine's Day biddies! I'd love to see what you end up rocking on your nails today. 
♡ Tweet me a pic @akaBailey