Friday, June 28, 2013

Tough Mudder at the Whistler Olympic Park

Tough Mudder came to Whistler, BC this past weekend (June 22-23), with both Dave and his visiting brother, Robert, participating in the challenge on Sunday.

The guys have been signed up for this for months, and Rob flew all the way from Tampa, FL to participate in what was his third Tough Mudder. 

If you're not familiar with Tough Mudder, it's a challenging military-style obstacle course that's broken up by running. The Mudders held at Whistler were on a 12-mile course at the Whistler Olympic Park and were comprised of 20 separate obstacles. The obstacles are pretty bonkers - they ranged from swimming through a dumpster full of ice, to jumping over fire, to climbing up and over walls, to getting zapped with electricity. The price of participating in the event as an athlete can range anywhere from about $100 to $180, depending upon when you sign up. Definitely a chunk of change. Also worth bitching about noting is that the cost of being a SPECTATOR is $20 in advance or $40 the day of. This I do not support. 

The Saturday Mudder was pretty overcast, as I understand, but Sunday ended up being quite sunny so there was plenty of sweat to go along with all of the mud. The boys got their registration packets and their race numbers to pin onto their shirts, in addition to getting their race numbers scrawled onto their foreheads with black marker:

.  she had some trouble with dave's forehead so she ended up marking up his arms instead  .

The guys made their way to the start line with the other athletes in their 10:20AM heat, and I set off with the other spectators.  Spectators were relegated to 3 different marked routes throughout the day, and each route allowed us to view particular obstacles. For example, the Green Spectator Route might take you to obstacles 2, 3 and 15, while the Purple Spectator Route might allow you to see obstacles 17-18. 

Thus, spectators could only actually see about 5 or 6 of the 20 total obstacles. This was done I suppose mostly for timing purposes: If spectators were to try watching every single obstacle, they couldn't make it to the next obstacle in time to see their athlete (who is running to the next obstacle) complete it. While our spectator routes were helpful bee-lines between some of the obstacles, they were completely out in the open to the sun - no shade whatsoever. Certainly not in the woods, as the course maps would lead you to believe.

At the second obstacle, where the athletes were to swim across a dumpster full of ice cubes, Rob dislocated his shoulder while pulling himself out of the dumpster. Luckily there was a medical tent quite nearby, but the poor guy had to wait in excruciating pain for several minutes before getting his arm rammed back into its socket by a doctor. Eesh. He was unable to complete many of the obstacles thereafter because he was wearing a sling and was unable to lift his arm over his head, but he was a trooper and ran along the whole rest of the way with David and completed what he could. 

Dave did really well at the obstacles that I could see, though he swears he thought he was going to die in the ice dumpster. Here he is in red shirt in the foreground, immediately after he'd come out of the dumpster. His brother is in the red shirt on top of the dumpster - he has literally JUST dislocated his shoulder in this pic:


In addition to the ice dumpster, I also saw David jump off a plank into a water pit 15 feet below in one obstacle, and make his way up a huge quarter pipe like it tweren't no thang in another obstacle. Here's a short video compilation of those three events (you can see Dave in the red shirt in the 2nd and 3rd clips):


And I watched him "slip 'n slide" through a bunch of dangling electric zappers:


And dominate some crazy monkey bars (the picture I took of this obstacle was awful but you can see the Funky Monkey obstacle here). 

He also climbed up and over a bunch of these walls with little fanfare:


Here are some other non-David shots of the course:


.  olympic ski jumps  .
.  tough mudders are tiny runners in the upper right  .

To conclude it all, they had to run through a chute of long, dangling wires that were zapping them with electricity. People did notttt seem to enjoy this part:

.  you can't see it, but he is gritting his teeth quite hard here  .

Overall it looked like a pretty exhilarating thing to participate in - everyone there was simultaneously psyched and devastated. Also, muddy. I was so proud of David for how strong 'n tough he is. I wish I'd been able to see all 20 of his obstacles!

And what a freaking day for it all. My goodness. Here's one of my favorite pics from the day - and yesss I have adjusted the exposure and saturation just for the fun of it:


The downside of the day was that I was pretty much dying in the sun all day long. We were out there for about 5 hours - the athletes needed to arrive an hour before their race time, and then the course itself takes them anywhere from 3-4.5 hours to complete.

For the $40 I was charged just to watch the race, I apparently couldn't afford a spot of shade anywhere. No tents for spectators at all. The one place along the entire course that provided any shade - more accurately, the ONLY shade - was at Obstacle 11, a part of the course which happened to go past the enormous tent that had been used earlier in the day for the athletes' registration process. This tent was huge enough to fit a very large wedding beneath it. Aside from about 15 feet of its length that was being used as a "bag drop" area for athletes, the rest of the massive tent was empty. Empty. 


.  effing empty  .


I was kicked out of this tent and told that no one was allowed in there. No amount of my very rational and calm pleading with the race volunteer about the size of the massive empty tent and the lack of shade anywhere else on the entire spectator route made a difference. She simply kept repeating that no one was allowed there. I wanted to just die. On her. And make her deal with my rotting, sun-beaten corpse. Oy.

But other than the heat and overexposure problem, the day could not have been more beautiful. I am willing to bet that the Whistler Tough Mudder course had some of the most stunning scenery of all the Mudders this year.

.  sexy sons of bitches  .


Whistler Olympic Park is certainly lovely in the sunny summertime. I'm sure it's even better in the snow, with all the mountains surrounding it and the bright green trees.

Have you ever done a Tough Mudder or been a spectator at one? If so, I'd love to know what you thought of the whole thing!

Facebook.com/akaBaileyBlog
Twitter.com/akaBailey

Follow on Bloglovin

Tuesday, June 25, 2013

Let's Go Fly A Kite!

So apparently during the sunnier months here in Vancouver, one can happen upon cool things while just out for an afternoon stroll. Like an eagle. Or a field of cute goslings...

... Or a giant kite jamboree!

And by "giant kite jamboree," I mean both that the number of people participating in the event was large... and that some of the kites were actually freaking giant.

Recently while out on a stroll, David and I turned a corner and were presented with this scene:

kites in vancouver


 Oh, what's that going on up ahead, you ask? JUST A LITTLE OF THIS:

kites in vancouver

kites in vancouver


This is Vanier Park, and it is right inside my Kitsilano neighborhood. The park is also home to a Space Museum, the Museum of Vancouver, and Bard on the Beach - a Shakespearean theater series that performs all summer long. Pretty cool, "eh"?  (I promise I didn't pick up a Canadian accent. This was only a test.)

Well for whatever reason, this particular day Vanier Park also happened to be Where the Kite Things Are. I wasn't mad about it.

kites in vancouver


kites in vancouver


This was one of the two biiiig kites - My Fair Lady:

kites in vancouver

kites in vancouver


Kind of random but definitely brought a smile to my face. Some of the largest kites I've ever seen! And what a beautiful day for it!! I don't currently own any kites, but there are so many open lawns and beaches to fly them that I might end up buying one at some point this summer.

On a random end note, do kites make anyone else think of Mary Poppins?


Facebook.com/akaBaileyBlog
Twitter.com/akaBailey

Follow on Bloglovin

Friday, June 21, 2013

(Subtle) Ruffian Nails - My First Attempt

I've been on a real kick of trying new things with my nail polish. I recently tried my first attempt at ombre nails (using a makeup sponge) as well as the "tape technique" for adding stripes to nails.

This week I wanted to try something else - Ruffian nails!


I've never tried Ruffian style nails before, but they are kind of like doing a reverse French tip. You basically leave a crescent moon shape at the base of your nails, along your cuticle. I've never even seen a tutorial on how to do it, so I always assumed there was some tape or possibly even reinforcer stickers involved. However, it came to my attention via a Twitter post this week that it can be done without tools or special stickers involved at all - just the nail polish brushes!

Thanks to @Swishienails for the tip and for the words of encouragement, by the way.


For her Ruffian nails, Swishie used a dusty blue polish as her base color (the color of the crescent) and another dusty blue with silver glitter as the top coat. I loved the way it looked - the top and bottom colors were nearly the same, but with a lot of glitter in the top color. I rifled through my own stash of polishes till I found two colors that could serve the same purpose... or so I thought.

.  orly preamp and rimmel baby pink  . 


After applying a top coat, I used two coats of Rimmel's Baby Pink (which you can also see in one of my favorite nail polish looks here) on all of my nails except my ring finger, which I painted with two coats of Orly's Preamp (which you can see in this throwback nail polish blog, but please forgive my cuticles in those old pics).

Next I carefully used my Preamp brush to apply it over the Baby Pink nails, trying my damnedest to make the remaining Baby Pink polish look crescent...ish. I'm sure this takes practice to perfect, so I'm giving myself a break for the slightly less than perfect crescents.

My real beef is that the colors are TOO freaking similar! You can barely tell at all that I've got two different polishes on... and thus my Ruffian style is completely lost upon everyone but myself!


So to feel better about this, I'm just telling myself in a reassuring tone that these are totally Ruffian style nails... just, liiiiike... really subtle ones. ;)

Facebook.com/akaBaileyBlog
Twitter.com/akaBailey


Follow on Bloglovin

Thursday, June 20, 2013

The Candy Aisle - Vancouver Candy Heaven!

I love me some sweets. I don't remember ever not being a huuuge fan of sugar. We didn't have much junk food in the house when I was younger (my mom bought us pretzel sticks for our school snacks, instead of Fruit By the Foot) (I effing hate pretzels, Mom), but we diiid have a sugar bowl. #WINK! My mom would catch me sneaking spoonfuls of sugar from that bowl alllll the time. And if you invited me over to your house to play, you just better hope your family didn't have a candy jar. Because if so, that's where you could find me chilling. Mmm... mini Reeses Peanut Butter Cups and M&Ms.... Also, obviously my allowance was spent on Fun Dips.

Well fast forward to zee present and ummm you still can find me chilling around the candy bowl at the party. Hey, some things you just don't grow out of. So when I come upon a legit candy store, it's like my Graceland. Even just looking at all the candy is a good time for me. Fortunately, there is an incredible candy store a mere .3 miles from my door! #Diabetes

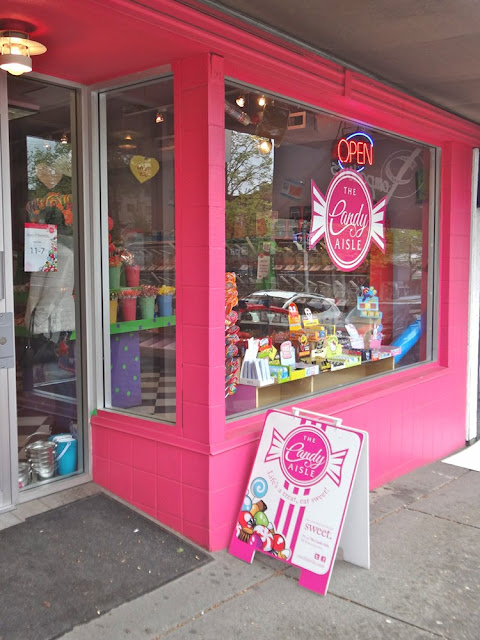
The Candy Aisle on 4th Ave in Vancouver is the place to be, if you're looking to go into a sugar coma. You can find candy here from all over the world!

the candy aisle vancouver

candy in the candy aisle vancouver
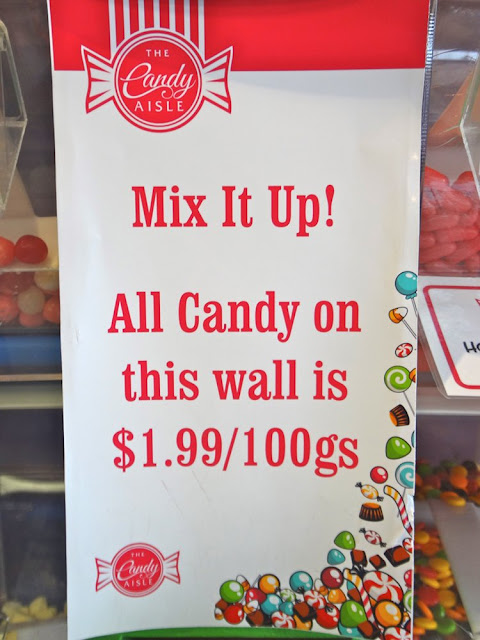
They've got a whole wall lined with those bins of candy that you can scoop out with a tiny shovel. Mix 'n match whatevaaaa!


mix n match candy at the candy aisle vancouver

(There is also a smaller section of $2.49/100g candies you can scoop!)

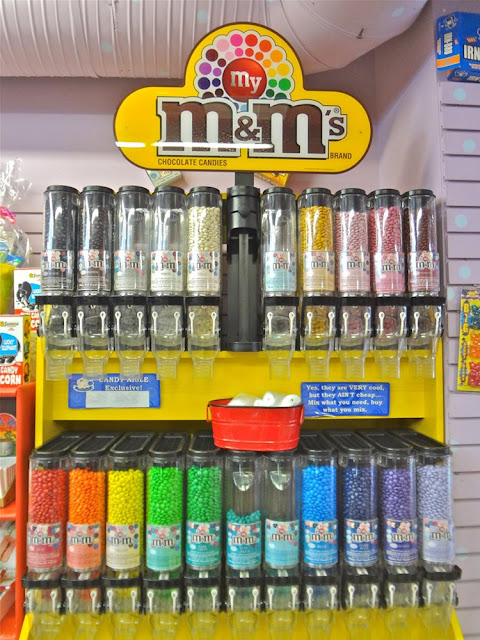
Here's one of those "candy store staples" that I find so fun to just look at - an M&M's mixing station:

mm dispensers the candy aisle vancouver

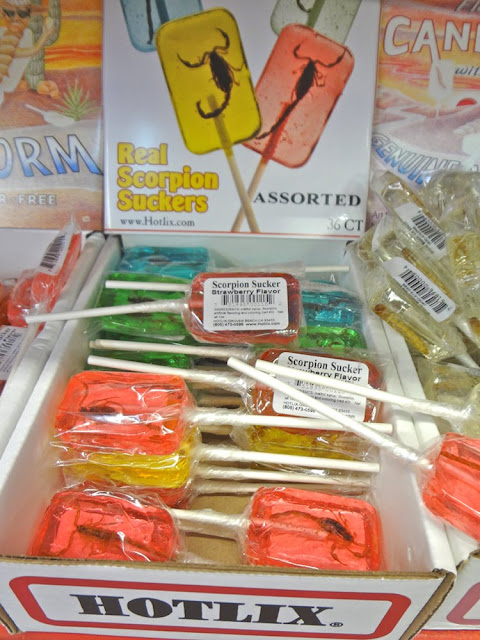
 There's some pretty weird shit in there as well...

cricket lollipop the candy aisle vancouver

There's a fabulous selection of the English candy that David loves from his childhood -
Aero, Curly Wurly, Flake, mmm...

english candy at the candy aisle vancouver

the candy aisle vancouver
.  literal kid in a candy shop  .

Gummies, Jelly Beans...

candy jelly beans the candy aisle vancouver

These cute mason jars that you can buy and fill up with candy as a gift:


A substantial amount of Pez dispensers to choose from, plus a register area that's set up like a cotton candy fair tent: 

cotton candy at the candy aisle vancouver

And if you go to The Candy Aisle be sure to look up...

candy boxes on the ceiling, the candy aisle vancouver

You may be able to find some of these candies for cheaper elsewhere, but you're not going to have as much fun. I bop into The Candy Aisle when I'm feeling extra feisty. I love to choose a small bagful of goodies from the $1.99/100g wall - especially the mini Reeses Peanut Butter Cups, Rockets (the exact equivalent of American Smarties), mini York Peppermint Patties, and those little pastel after-dinner mints. Mmm...

Alright, all this talk of candy is making me hungry. Excuse me while I go scoop myself some ice cream...

Facebook.com/akaBaileyBlog
Twitter.com/akaBailey


Follow on Bloglovin

Tuesday, June 18, 2013

Deece Purch: A $20 Thrifted Chair

David and I did a tremendous amount of paring down of our furniture when we moved from Massachusetts to Oregon last year. We went from having a couch, coffee table and living room chair to just having a loveseat couch... and a Tucker Tote covered in blankets for an ottoman. Normally we don't do too much entertaining at home, so our lack of seating wasn't doing much harm. It was just making our living room look pretty sparse. But when my sister came to visit a couple of weeks ago and we didn't have enough seating for three people in our living room, it was pretty obvious we needed to add a chair to the room.

Now we've got more company heading our way - Dave's brother is coming for a visit this week, all zee way from Florida - so there was some urgency to finding the right chair at the right price to add to our living room. We've been dreading making the trek to Ikea in Richmond, because it's a real pain in the ass to get there and then you have to actually deal with Ikea once you arrive! #Oy.

So when I found thissss little lady at the Salvation Army on 4th Ave for $19.99, I knew it needed to be ours... immediately:

pello ikea chair

We've actually contemplated buying this exact same chair from Ikea before. It's called the Pello and it normally sells for $60. The one I found in Salvay wasn't perfect... but it was damn close to it!!

There were just a few rogue spots in the white fabric of the chair...

thrifted pello ikea chair


... plus a couple minor knicks and marks on the wooden frame:

ikea pello chair from thrift store

I checked the entire chair to make sure that the white fabric cover was removable, so that I'd be able to bleach it and wash it easily. Seeing that the cover would be really easy to remove and wash, I was sold.

sold sign on salvation army ikea chair
.  thanks be to gloria  .
Not long afterwards, the chair was home in my living room! All I had to do was unzip the cover in a few places to remove the 4 different cushions, spray the whole cover with bleach water, throw it into the washing machine, and then let it air dry. It came out perfectly! I used some regular kitchen cleaner and a soft cloth to clean the wooden frame, removing all of the random marks and scuffs on it. Honestly, it looks pretty damn close to new, if you ask me! To boot, it was $40 less than it would have been at Ikea PLUS it took us less than 10 minutes to get to the Salvay with our car, load the chair in, and bring it home. You can't beat that!

Next on the "furniture" agenda is to buy me a new desk that I can use as a crafting/collage-making surface. We also need a real ottoman, though the Tucker Tote is really classing up the joint...

Facebook.com/akaBaileyBlog
Twitter.com/akaBailey
Follow on Bloglovin

Monday, June 17, 2013

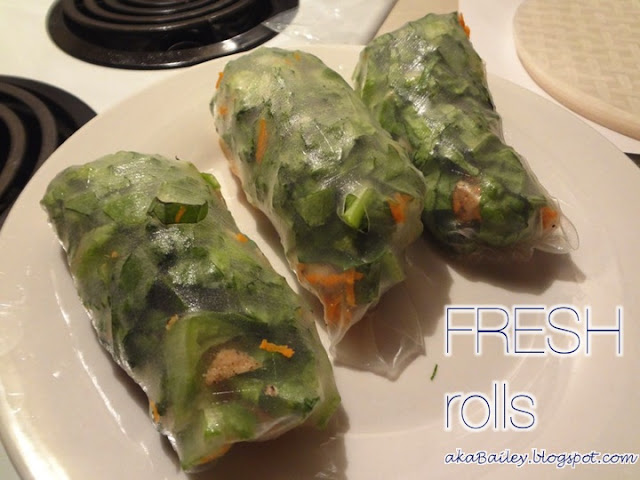
Making Fresh Rolls with Peanut Sauce at Home

A couple years ago, my good friend Sarah taught me how to make fresh rolls at home, complete with homemade peanut sauce for dipping. But the frighteningly fragile, delicate nature of rice paper plus the daunting task of mixing my own peanut sauce kept me from trying to make them on my own - without my Sarah to guide me. In the last few months, however, I've made these little guys three times... and am actually pretty proud of how the entire dish has turned out each time!

fresh rolls at home
While a couple of the required ingredients are admittedly a little obscure, once they're in your pantry/fridge you probably will not need to re-up on them for a long time. So there's a happy thought to tuck under your pillow. 

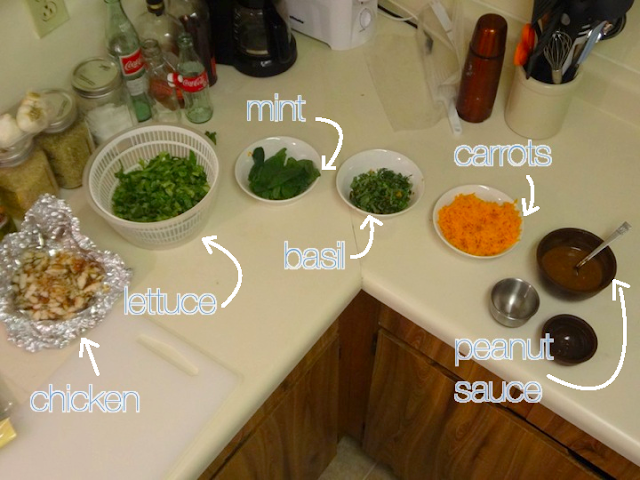
Ingredients:
ingredients for fresh rolls

Fresh Rolls:
- 1 pound of chicken (I used tenderloins)
- 2 carrots (I used 3 but it ended up being way too much!)
- half a head of romaine lettuce 
- 1/2 cup basil
- 1/3 cup mint
- rice paper sheets (you can get a package of these at any Asian food market)
- salt & pepper

Peanut Dipping Sauce:
- 2 tbsp peanut butter (crunchy or smooth, doesn't matter - I've used both)
- 2 tbsp water
- 1 tbsp soy sauce
- 1/3 cup Hoi Sin Sauce

This recipe makes enough for two people.

Directions:

Season and cook your chicken. I effing hate touching raw chicken, how 'bout you?

cooking chicken for fresh rolls
It's more fun to build your fresh rolls if all of your veggies are nicely shredded.  I cut my romaine and basil into thin strips, shredded my carrots, chopped the chicken into bits, and left the mint leaves as-is. 

prepared ingredients for fresh rolls

The peanut sauce can be made to your own tastes. I like mine a bit sweeter, so I add a little more peanut butter and a little less soy sauce. Dave prefers his to be saltier, so he goes heavier on the soy sauce.  Start by mixing the peanut butter and water together and combining them well. Then stir in your hoi sin sauce and finally add the soy sauce. Definitely taste as you go!

homemade peanut dipping sauce

Hey here's something you may not have dealt with at home before - rice paper! Whoop whoop! So the bad news is that this is a tricky step and it's really easy to tear the rice paper. The good news is that rice paper appears to come in enormous packages with tons of sheets, so there seems to be some wiggle room for error.

First, make sure you have a pan that is large enough to hold your rice paper. That's important. Put about an inch of water into the pan and heat it up - you want the water to be a little hotter than "warm"... which is a confusing way of saying, "Make sure you can still touch the water without burning ya poor little hands!"

Remove a sheet of rice paper from your package and slide it into the water, like so:

dipping rice paper into water
.  gym clothes, what what  .
dipping rice paper into water for fresh rolls
.   well dippity dooooooo!!  .

Monitor the submerged rice paper by touching it a bit. When it's become pliable and the edges are beginning to turn up, it's time to take it out of the water.  Here's the tricky part. You gotta pull that sucker out of the water while a) trying not to tear it and b) not letting it fold over on itself. The sheet is going to be sticky and will try so hard to stick to itself, but it's your job to not let that happen. Try to spread it out gingerly with your fingers and stretch it to its circular form:

pulling rice paper out of hot water
If parts of it are sticking to itself, I kind of dip those parts back into the water to unstick them and then continue taking the entire thing out of the water. Seriously, there is enough rice paper in your package for you to practice this a couple of times if you want to. I'm all about the practice rounds.

Lay the sheet of rice paper down onto a surface where you'll build each fresh roll. I go with a rubber cutting board because I've found that the rice paper likes to stick to wooden cutting boards.

Now it's time to build your roll. Add your veggies and chicken, layer by layer:

building a fresh roll at home
.  lettuce makes a good base  .
making homemade fresh rolls
.  then chicken and carrots  .
fresh rolls at home
.  sprinkle it with basil  .
adding mint to fresh rolls
.  lay your mint over the top  .
... and roll 'er up! Start at one end and treat it like a dainty, fragile burrito - tucking in the sides and rolling them in as well. 

rolling up a fresh roll

rolling up a fresh roll

rolling up a fresh roll
Sweet, delicious, fresh success!  Heyooo!

homemade fresh rolls
Guys, they're so good.
Serve with your peanut sauce and enjoy the shit out of these!

homemade fresh rolls with peanut dipping sauce

If you try making these at home and don't tell me about it, I will be so mad at you. 

Facebook.com/akaBaileyBlog
Twitter.com/akaBailey
Follow on Bloglovin